# Creating an experiment using the ABsmartly LaunchPad
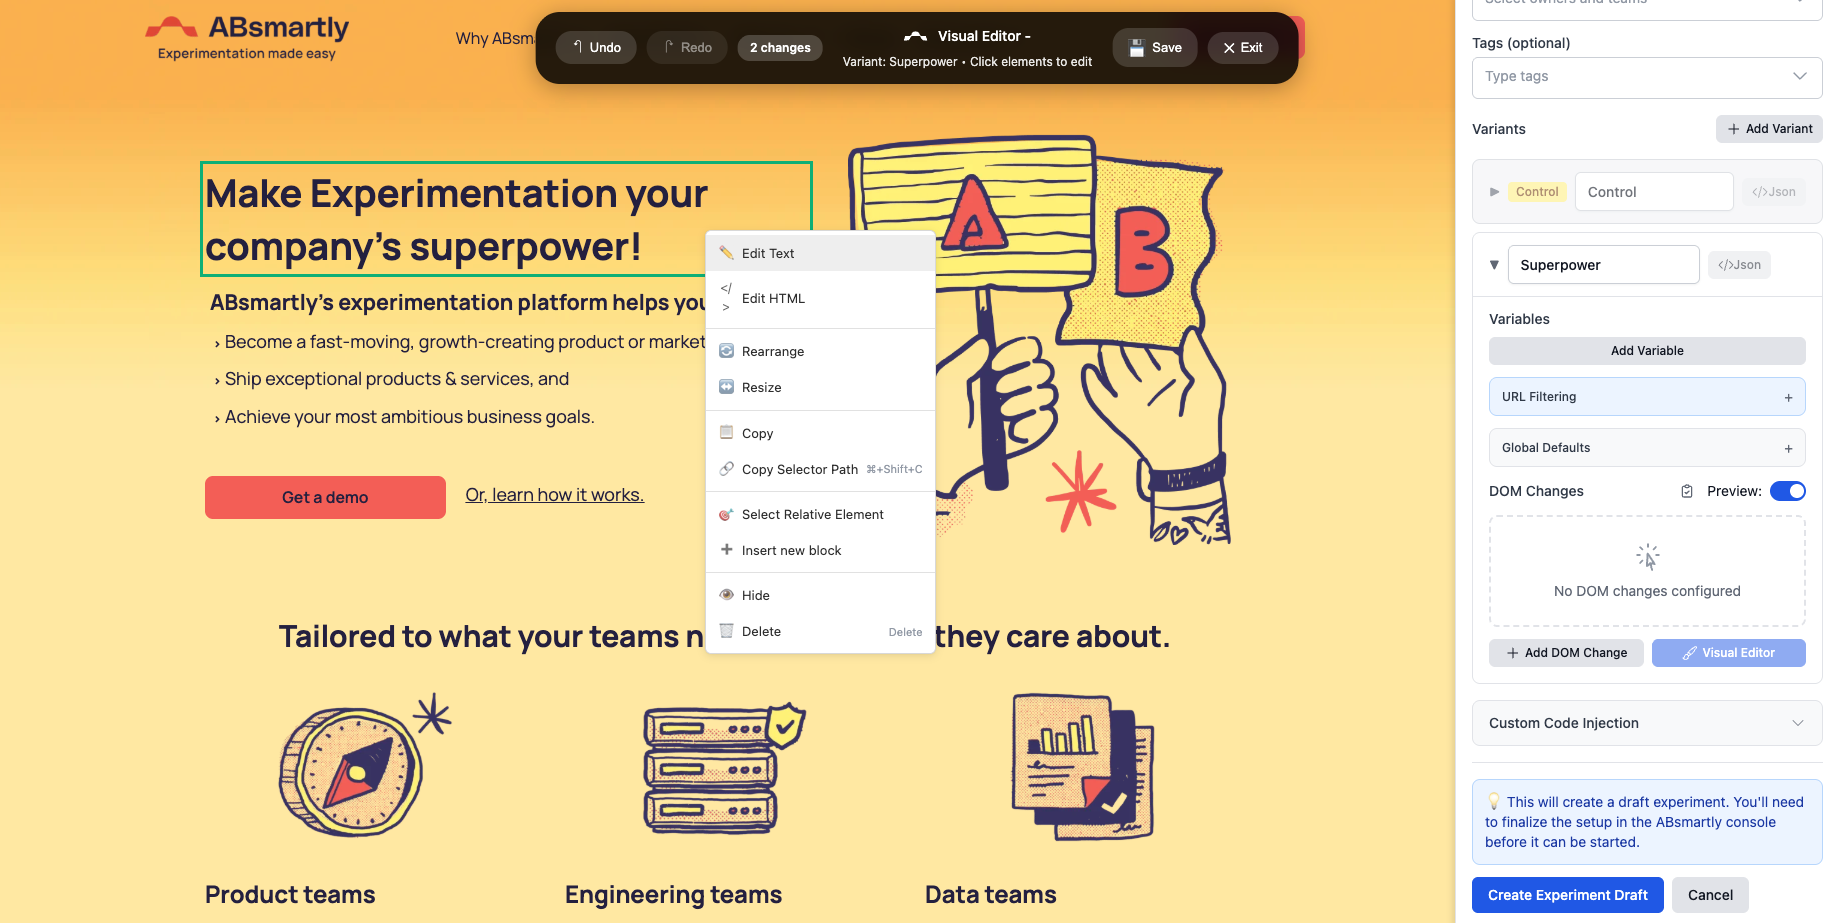
This guide explains how to create a new experiment from scratch using the **ABsmartly LaunchPad**.
This guide assumes that you already installed and configured the LaunchPad.
***
## Experiment Metadata
Begin by defining the core information for your experiment.
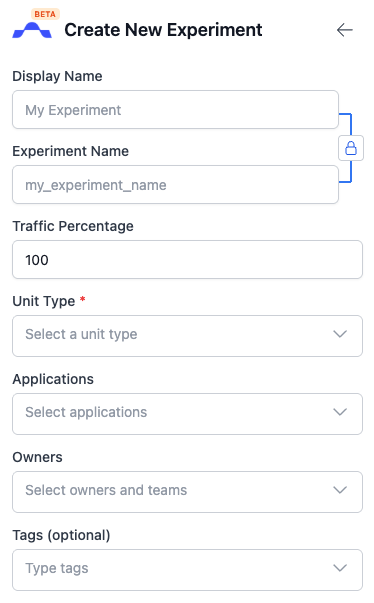
| Field | Description | Tips |
| ---------------------- | --------------------------------------------------------------------------------- | ------------------------------------------------------------------------------ |
| **Display Name** \* | The name displayed in the LaunchPad & in the web console. | Use a clear, human-readable name that reflects the purpose of the test. |
| **Experiment Name** \* | The technical identifier used in your implementation code. | Keep this concise, lowercase, and use underscores (e.g. `checkout_flow_test`). |
| **Traffic Percentage** | The proportion of total eligible traffic that will be included in the experiment. | Unless you have a good reason, keep it at 100%. |
| **Unit Type** \* | Determines how visitors are tracked (email, user id, anonymous id, etc). | Choose the same unit type you use in your SDK implementation. |
| **Applications** | The applications where this experiment will run. | The same experiment can run across multiple apps or sites. |
| **Owners** | Team(s) responsible for creating and maintaining the experiment. | Helps accountability and tracking in large organizations. |
| **Tags** | Optional keywords for organizing and filtering experiments. | Tag experiments by feature, product area, or release cycle. |
All fields marked with \* are required before proceeding.
***
## Variants
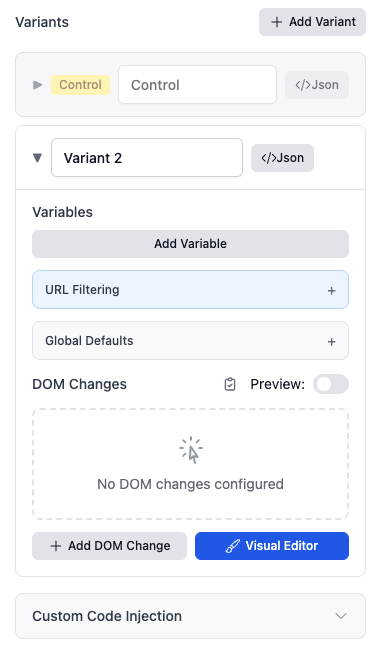
Each experiment requires at least a control variant and one or more treatment variants. By default, experiments are created with 1 treatment variant.
### Add Variants
Click **Add Variant** to add a new variant to your experiment.
> **Note:** When using the LaunchPad, traffic is always split equally between all the variants. To change this, you can open the experiment on the web console and change the traffic split.
***
## Configuring the Variants
Fine-tune the behavior of each variant in this section.
### Variant Variable
***
### URL Filtering
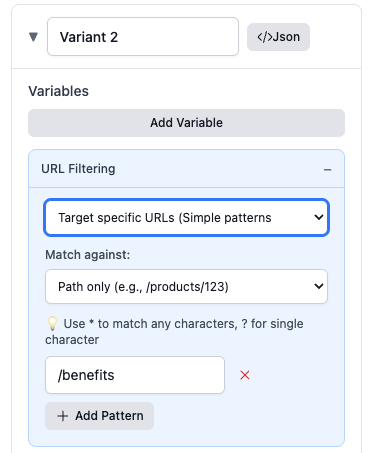
Use **URL Filtering** to define exactly where the experiment is active. Rules can target different parts of the URL, support multiple match types, and can be combined as include or exclude conditions.
#### What you can match
* **Hostname / subdomain** (e.g., `www.example.com`, `staging.example.com`)
* **Path** (full path or segments, e.g., `/checkout`, `/product/*`)
* **Query parameter key** (e.g., `utm_source`)
* **Query parameter value** (e.g., `utm_source=ads`)
* **Protocol** (e.g., `https` only)
* **Fragment** (the part after `#`)
#### Match types available
* **equals** – matches the value exactly
* **starts with** – value begins with a string (e.g., `/checkout`)
* **contains** – value contains a substring (e.g., `/promo/`)
* **matches wildcard** – supports `*` for any sequence (e.g., `/product/*/reviews`)
* **matches regex** – advanced pattern using regular expressions
#### Include vs. exclude
* **Include rules** explicitly allow the experiment to run when conditions are matched.
* **Exclude rules** prevent the experiment from running when matched, even if an include would otherwise match.
#### Combining multiple rules
* Rules within the same group are evaluated using **AND** (all must match) unless otherwise indicated in the UI.
* Multiple groups are evaluated using **OR** (any matching group activates the experiment).
* Drag to **reorder** groups when precedence matters.
#### Examples
| Goal | Rule(s) |
| ---------------------------------- | ------------------------------------------------------------------------------- |
| Run on all product pages | Include → Path **matches wildcard** `/product/*` |
| Exclude the success page | Exclude → Path **equals** `/checkout/success` |
| Only when a campaign is present | Include → Query key **equals** `utm_campaign` |
| Only for a specific campaign value | Include → Query key `utm_campaign` **AND** Query value **equals** `spring_sale` |
| Only on a specific subdomain | Include → Hostname **equals** `staging.example.com` |
| Advanced pattern | Include → Path **matches regex** `^/search\\?q=.*$` |
> **Tips**
>
> * Prefer **wildcards** or **starts with** for simple patterns; reach for **regex** only when necessary.
> * Keep rules as specific as needed to avoid unintended exposure (e.g., filter to `/checkout/*` instead of `/`).
***
### Global Defaults
Set default values that apply across all variants unless explicitly overridden.
This provides a consistent baseline configuration for new variants.
| Setting | Description |
| ---------------------------------- | ----------------------------------------------------------------------------------------- |
| **Use !important flag** | The changes will overwrite existing CSS. |
| **Wait for element (lazy-loaded)** | The changes will only be applied once the element has appeared in the DOM. |
| **Persist styles** | The changes will be reapplied after the JS framework (React/Vue/Angular) overwrites them. |
***
### DOM Changes
Use **DOM Changes** to capture all the changes made to the page.
#### Manual modification
Use **DOM Changes** to apply direct modifications to page elements for each variant.
These actions are configured manually in the **Add DOM Changes** panel.
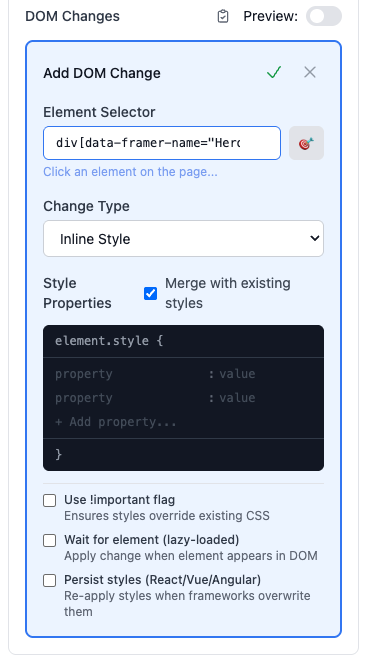
| Change Type | Description | Typical Use | Tips |
| ---------------- | ----------------------------------------------------------- | ---------------------------------------------------------- | ------------------------------------------------------------ |
| **Text** | Replaces the visible text content of the selected element. | Update headings, labels, or button copy. | Keep copy short and consistent with the page tone. |
| **Inline Style** | Applies inline CSS to the element. | Adjust colors, spacing, or font styles. | Use sparingly—inline styles override other CSS rules. |
| **Stylesheet** | Adds CSS rules that apply across the page for this variant. | Introduce reusable style changes. | Prefix selectors with a variant class to avoid conflicts. |
| **Class** | Adds, removes, or toggles CSS classes. | Trigger existing site styles without editing CSS directly. | Prefer this when styles already exist in your design system. |
| **Attribute** | Adds, edits, or removes HTML attributes. | Modify `href`, `alt`, or `aria-*` values. | Maintain accessibility; use valid attributes. |
| **HTML** | Edits or replaces the inner HTML of an element. | Insert markup like links or emphasized text. | Avoid complex structures; use cautiously. |
| **Javascript** | Injects and runs Javascript code. | Add dynamic behavior or event handling. | Keep scripts short; test thoroughly before rollout. |
| **Move/Reorder** | Moves or repositions elements within the page. | Adjust layout or hierarchy of elements. | Ensure layout integrity across breakpoints. |
> Toggle **Preview Mode** to verify the update before saving.
***
#### Visual Editor
The **Visual Editor** allows interactive, point-and-click modifications to page elements without writing code.
Each action updates the page in real time and can be previewed before saving.
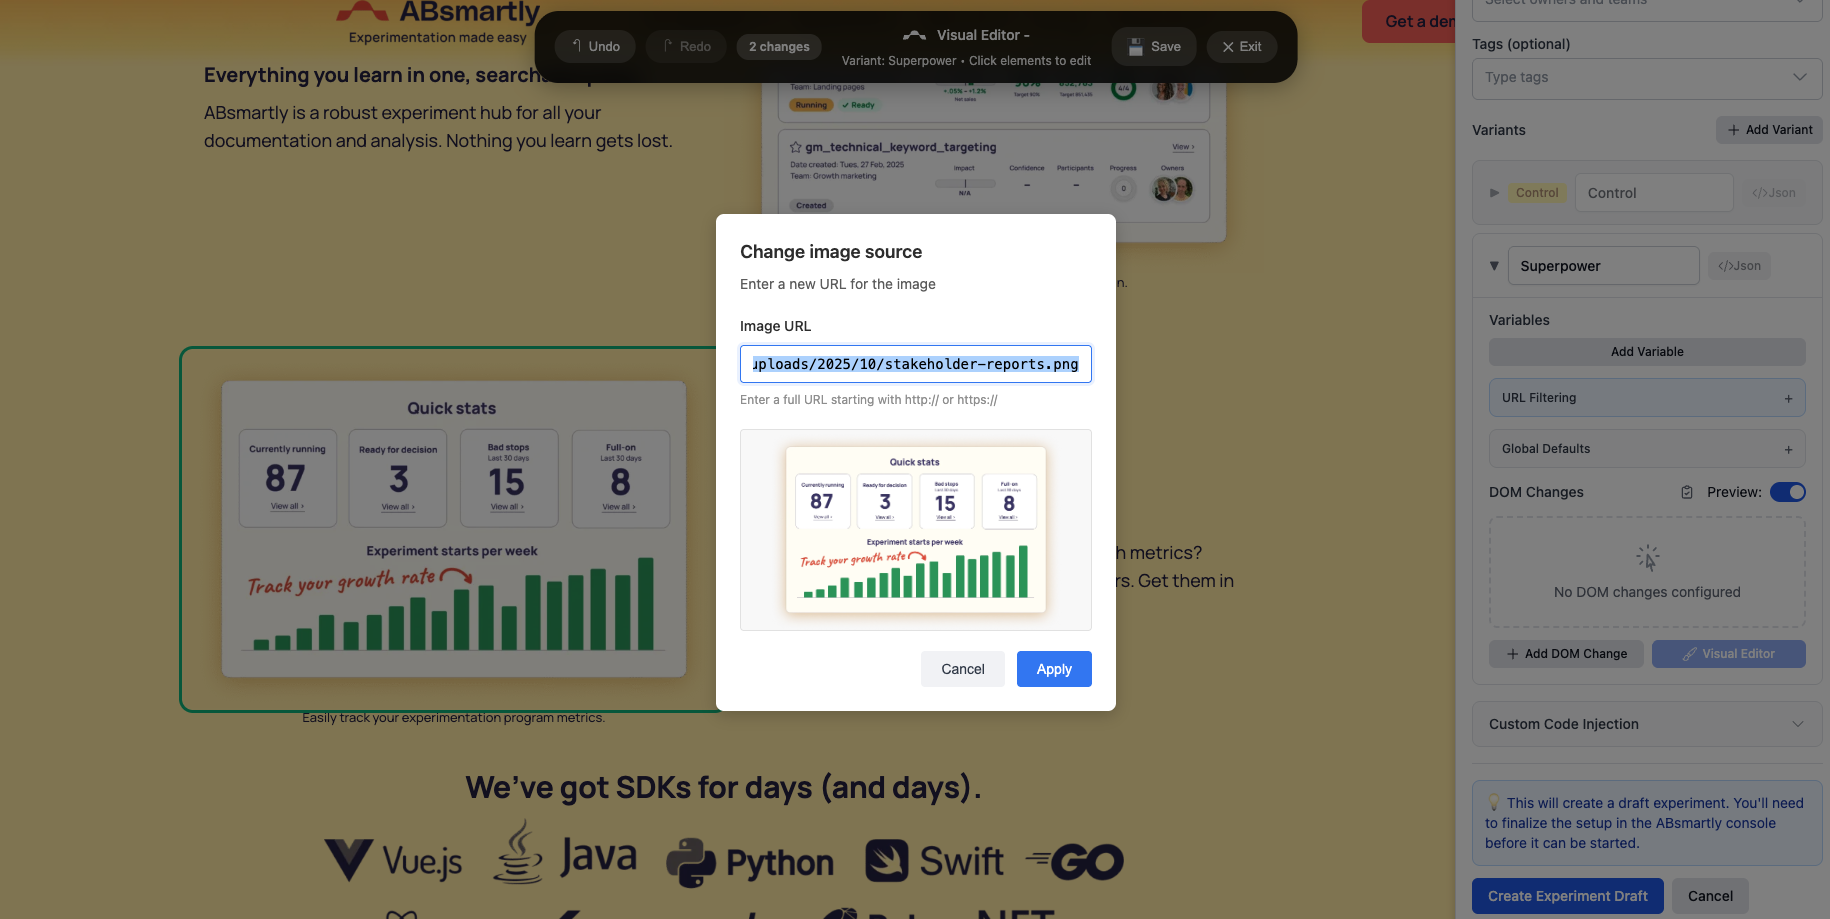
| Action | Description | Typical Use | Tips |
| ----------------------------- | ------------------------------------------------------------ | ----------------------------------------------------------- | ------------------------------------------------------------------------ |
| **Edit Text** | Modify the visible text of any selected element. | Update titles, labels, or button copy directly on the page. | Keep copy changes small for easier comparison and review. |
| **Edit HTML** | Edit the HTML content of a selected element. | Add inline markup like links or emphasis. | Avoid large structure edits; use Insert New Block for new elements. |
| **Rearrange / Resize** | Drag elements to a new location or resize them. | Change layout or adjust visual proportions. | Test across screen sizes to maintain responsive design. |
| **Copy / Copy Selector Path** | Duplicate an element or copy its CSS selector. | Reuse elements or locate them for CSS rules. | Useful for targeting elements in Code Injection or Stylesheets. |
| **Select Relative Element** | Switch the selection to a parent, sibling, or child element. | Target nearby elements that are hard to select directly. | Ideal for dynamic layouts or repeating structures. |
| **Insert New Block** | Add a new element before, after, or inside another. | Insert promotional banners, notices, or new CTAs. | Keep additions minimal and consistent with the existing design. |
| **Hide / Delete** | Hide or remove the selected element. | Temporarily disable non-essential UI elements. | Use *Hide* for reversibility; *Delete* removes the element from the DOM. |
***
## Code Injection
Apply Javascript or CSS snippets directly using **Code Injection**.
1. Open the **Code Injection** panel.
2. Choose **Javascript** or **CSS** mode.
3. Enter your custom code.
4. Save and preview the effect in real time.
> **Tip:** Keep injected scripts lightweight; complex logic is better implemented in your main app code.
***
## Create the Draft and Finalize the Setup on the Web Console
When configuration is complete:
1. Review all experiment metadata and variant definitions.
2. Click **Create Draft** to save a working version.
3. Use **Preview Mode** to validate expected behavior.
4. Finalise the setup on the web console (add metrics, etc)
5. Start the experiment in web console
***
## Result
You have now:
* Configured experiment metadata.
* Created and customized variants.
* Applied DOM and code changes.
* Saved and finalized the setup.
The experiment is ready for QA validation and launch monitoring.