Setup
The ABsmartly MCP server can be added to any MCP-compatible client. This page covers Claude Desktop, Claude Code, Cursor, Windsurf, VS Code (Copilot), Gemini (CLI and Code Assist), ChatGPT and the DXT extension.
For details on API keys, the OAuth flow and supported Authorization header
formats, see Authentication.
Transports
The server is reachable on two HTTP endpoints:
| Endpoint | Transport | Notes |
|---|---|---|
https://mcp.absmartly.com/mcp | Streamable HTTP | Modern MCP transport (recommended for new installs). |
https://mcp.absmartly.com/sse | SSE | Legacy transport. Still works; required by some older clients. |
The MCP spec deprecated SSE in March 2025, but /sse continues to be supported
for compatibility.
You can also run the server locally over stdio with npx @absmartly/mcp, which
reuses your ABsmartly CLI config and macOS Keychain credentials.
Claude Desktop
- OAuth (recommended)
- API Key (URL)
- API Key (headers via mcp-remote)
- Local stdio
Open Settings → Connectors, scroll to the bottom, and click Add custom connector.
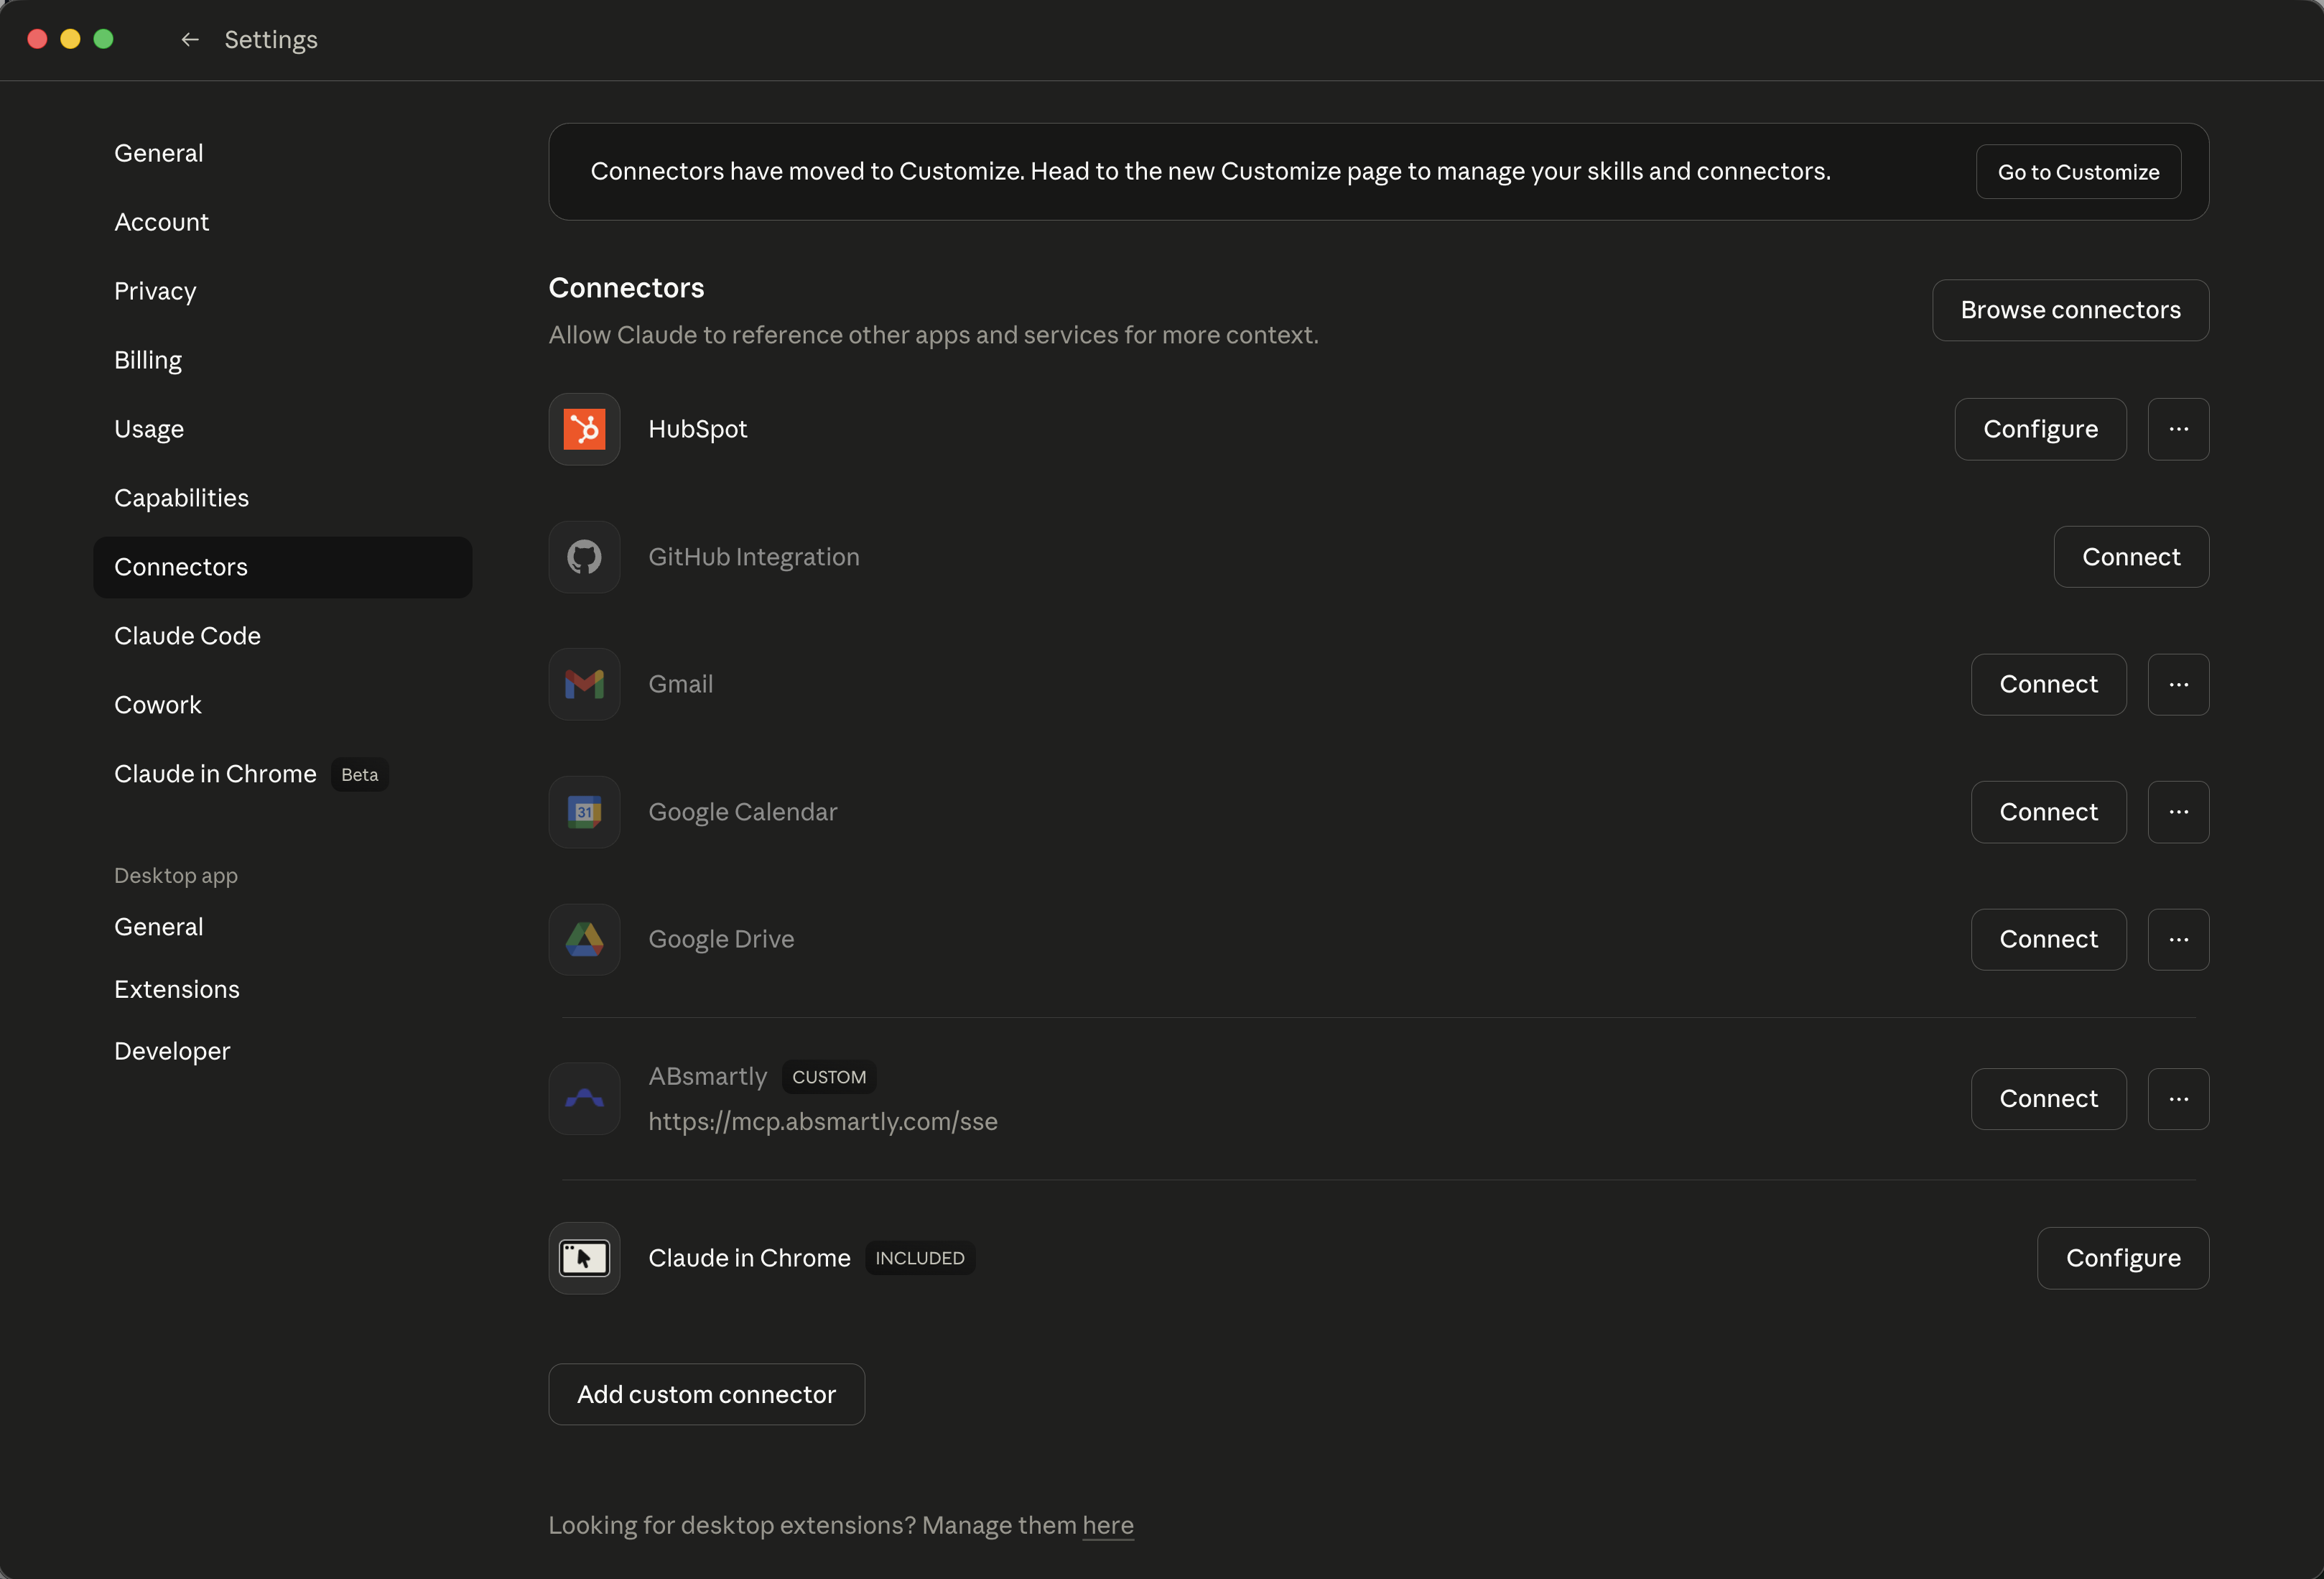
In the dialog, give the connector a name (e.g. ABsmartly) and paste the URL
into Remote MCP server URL:
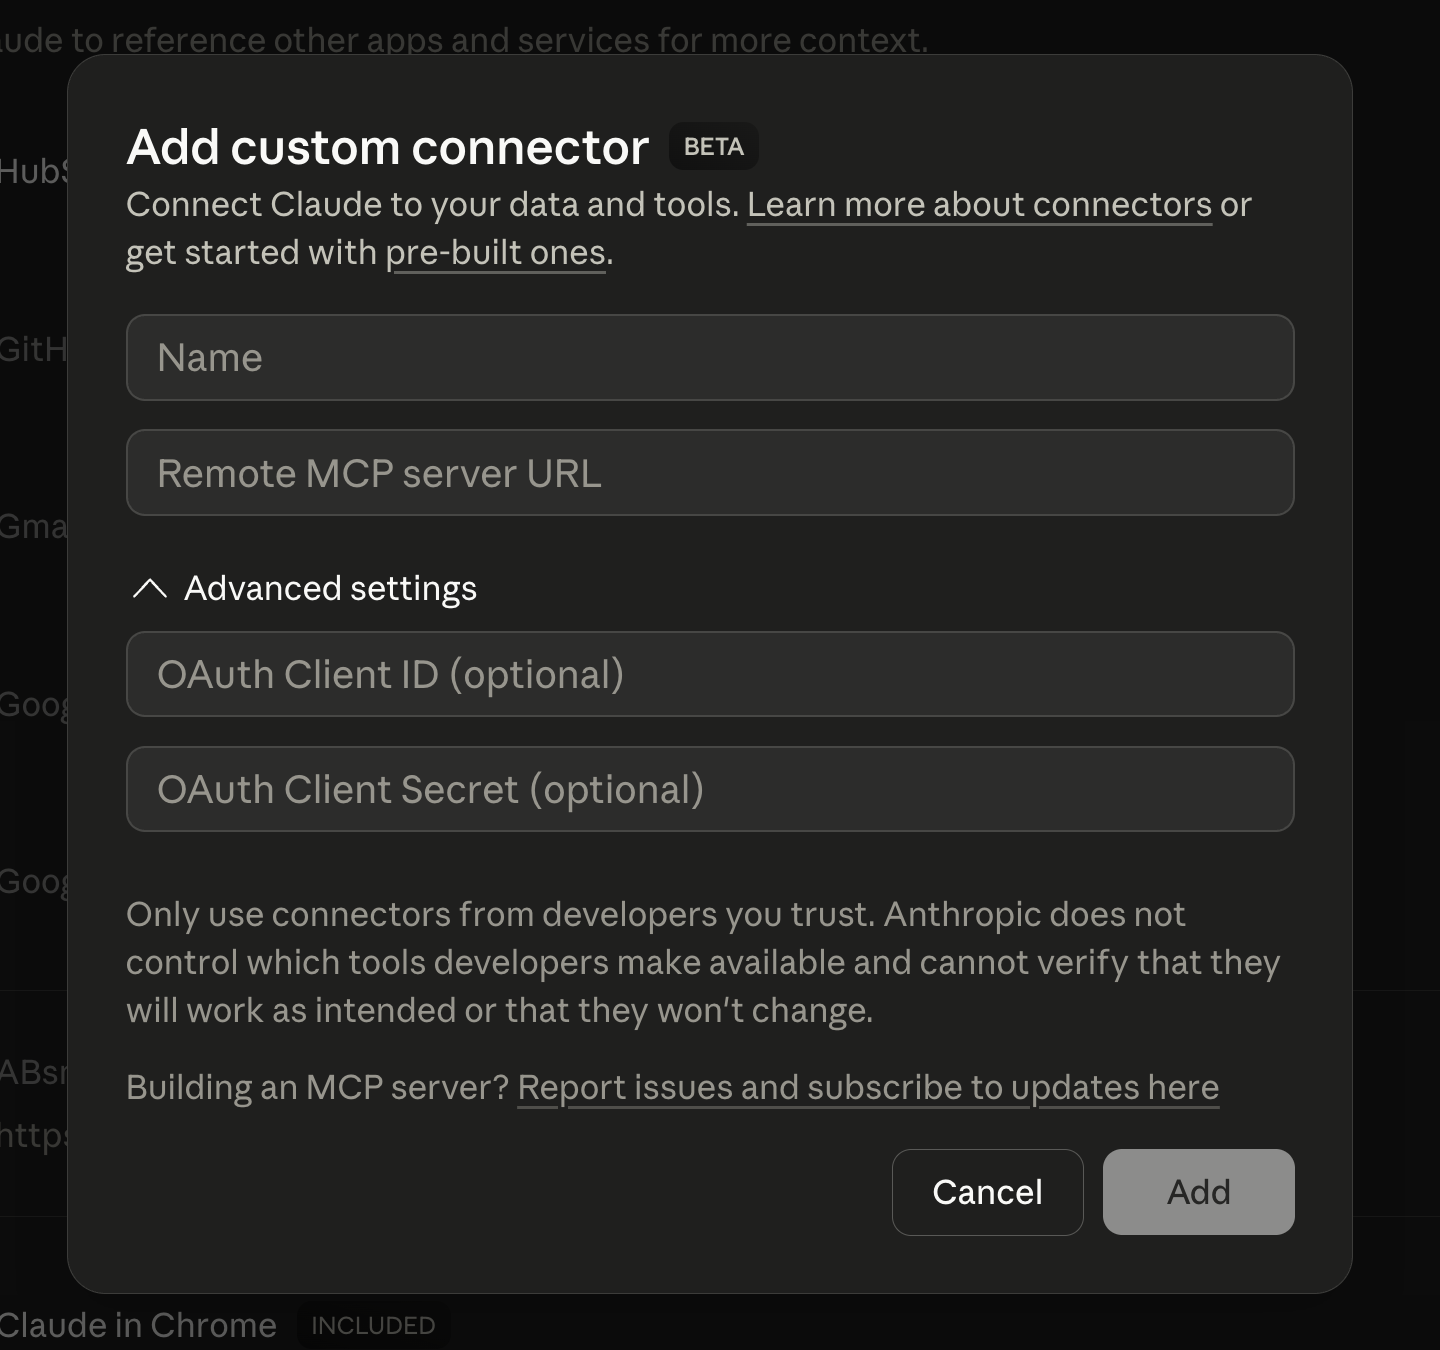
URL:
https://mcp.absmartly.com/sse?absmartly-endpoint=https://your-instance.absmartly.com
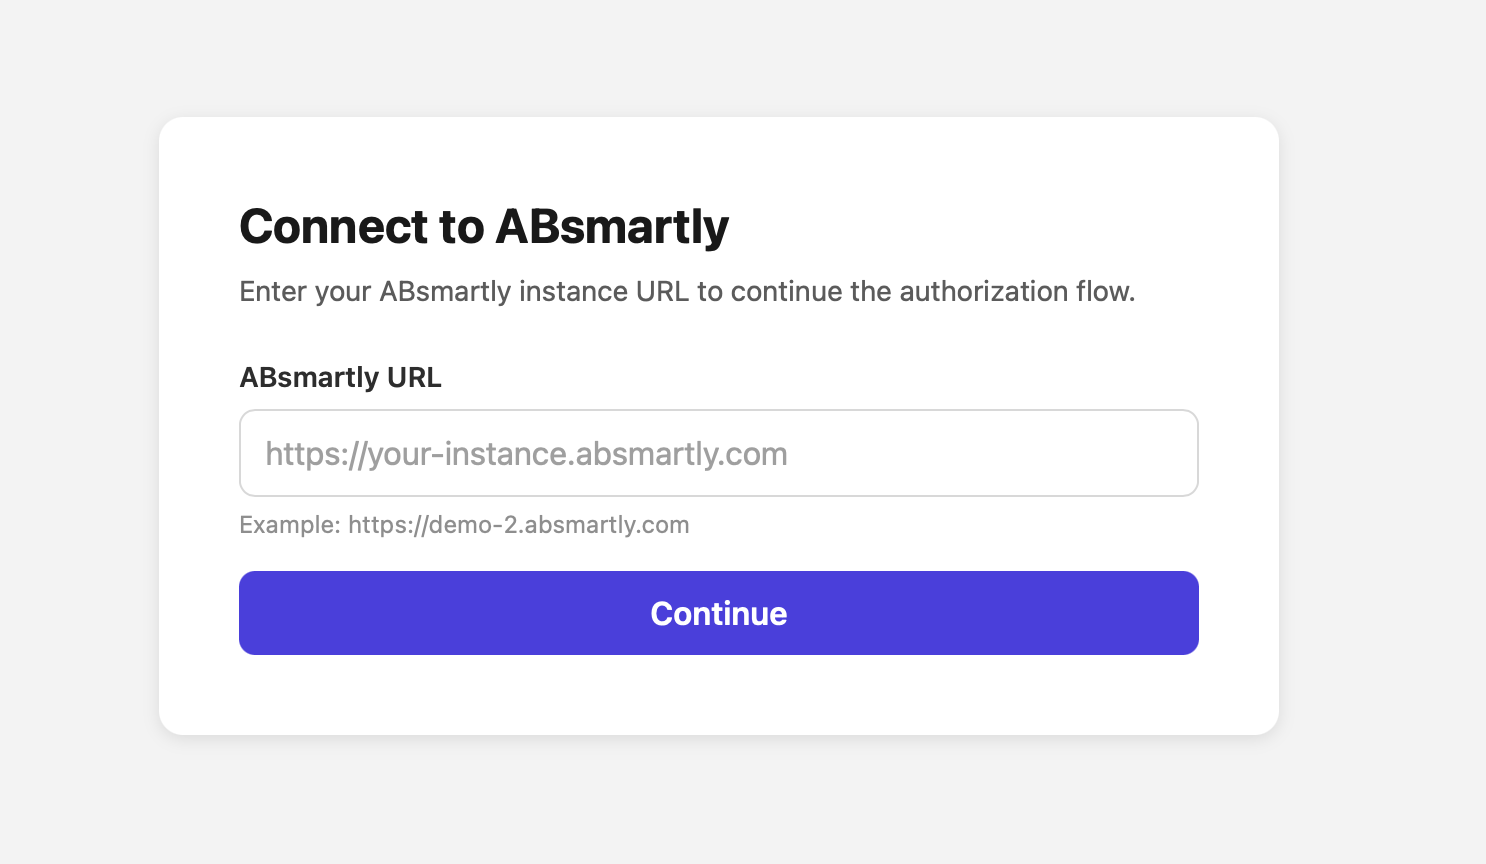
Click Add, then Connect. Claude Desktop will open your browser for ABsmartly login (SAML/credentials). After authentication, the MCP connection is established automatically.
The absmartly-endpoint query parameter is optional. If omitted, the OAuth flow
will prompt you to enter the URL of your ABsmartly instance in the browser before
login:
Pass the API key directly in the URL — no mcp-remote bridge required:
https://mcp.absmartly.com/sse?api_key=YOUR_API_KEY&absmartly-endpoint=https://your-instance.absmartly.com
To pass the key via headers instead of the URL, use the mcp-remote bridge —
Claude Desktop doesn't support custom headers natively for remote servers.
~/Library/Application Support/Claude/claude_desktop_config.json (macOS):
{
  "mcpServers": {
    "absmartly": {
      "command": "npx",
      "args": [
        "mcp-remote@latest",
        "https://mcp.absmartly.com/sse",
        "--header", "Authorization:YOUR_API_KEY",
        "--header", "x-absmartly-endpoint:https://your-instance.absmartly.com"
      ]
    }
  }
}
Uses your ABsmartly CLI config and macOS Keychain credentials:
{
  "mcpServers": {
    "absmartly": {
      "command": "npx",
      "args": ["@absmartly/mcp", "--profile=production"]
    }
  }
}
Claude Code
- Remote · API Key (SSE)
- Remote · API Key (Streamable HTTP)
- Remote · OAuth
- Local stdio
- Project config (.mcp.json)
claude mcp add --transport sse --scope user absmartly \
  https://mcp.absmartly.com/sse \
  -H "Authorization:YOUR_API_KEY" \
  -H "x-absmartly-endpoint:https://your-instance.absmartly.com"
Subdomain shorthand — auto-constructs https://<subdomain>.absmartly.com/v1:
claude mcp add --transport sse --scope user absmartly \
  https://mcp.absmartly.com/sse \
  -H "Authorization:my-subdomain YOUR_API_KEY"
Recommended for new installations:
claude mcp add --transport http --scope user absmartly \
  https://mcp.absmartly.com/mcp \
  -H "Authorization:YOUR_API_KEY" \
  -H "x-absmartly-endpoint:https://your-instance.absmartly.com"
Streamable HTTP is the modern MCP transport. The /sse URL still works for
older clients.
claude mcp add --transport sse --scope user absmartly \
  "https://mcp.absmartly.com/sse?absmartly-endpoint=https://your-instance.absmartly.com"
Then run /mcp in Claude Code to authenticate when prompted. The
absmartly-endpoint query parameter is optional — omit it and the OAuth flow
will prompt you for the instance URL in the browser.
claude mcp add --scope user absmartly -- npx @absmartly/mcp --profile=production
{
  "mcpServers": {
    "absmartly": {
      "type": "sse",
      "url": "https://mcp.absmartly.com/sse",
      "headers": {
        "Authorization": "YOUR_API_KEY",
        "x-absmartly-endpoint": "https://your-instance.absmartly.com"
      }
    }
  }
}
Use --scope project instead of --scope user to write to .mcp.json (shared
via version control).
Cursor
One-click install (OAuth): . Cursor will prompt you for the ABsmartly instance URL in the browser, then the flow completes automatically.
Or configure manually in .cursor/mcp.json (project) or
~/.cursor/mcp.json (global):
- API Key (SSE)
- API Key (Streamable HTTP)
- OAuth
- Local stdio
{
  "mcpServers": {
    "absmartly": {
      "url": "https://mcp.absmartly.com/sse",
      "headers": {
        "Authorization": "YOUR_API_KEY",
        "x-absmartly-endpoint": "https://your-instance.absmartly.com"
      }
    }
  }
}
Modern transport, recommended:
{
  "mcpServers": {
    "absmartly": {
      "type": "http",
      "url": "https://mcp.absmartly.com/mcp",
      "headers": {
        "Authorization": "YOUR_API_KEY",
        "x-absmartly-endpoint": "https://your-instance.absmartly.com"
      }
    }
  }
}
{
  "mcpServers": {
    "absmartly": {
      "url": "https://mcp.absmartly.com/sse?absmartly-endpoint=https://your-instance.absmartly.com"
    }
  }
}
Cursor will detect the OAuth requirement and open your browser for login. The
absmartly-endpoint query parameter is optional.
{
  "mcpServers": {
    "absmartly": {
      "command": "npx",
      "args": ["@absmartly/mcp", "--profile=production"]
    }
  }
}
Windsurf
Configure ~/.codeium/windsurf/mcp_config.json:
Windsurf uses "serverUrl" (not "url").
- API Key (SSE)
- API Key (Streamable HTTP)
- OAuth
- Local stdio
{
  "mcpServers": {
    "absmartly": {
      "serverUrl": "https://mcp.absmartly.com/sse",
      "headers": {
        "Authorization": "YOUR_API_KEY",
        "x-absmartly-endpoint": "https://your-instance.absmartly.com"
      }
    }
  }
}
{
  "mcpServers": {
    "absmartly": {
      "serverUrl": "https://mcp.absmartly.com/mcp",
      "headers": {
        "Authorization": "YOUR_API_KEY",
        "x-absmartly-endpoint": "https://your-instance.absmartly.com"
      }
    }
  }
}
{
  "mcpServers": {
    "absmartly": {
      "serverUrl": "https://mcp.absmartly.com/sse?absmartly-endpoint=https://your-instance.absmartly.com"
    }
  }
}
{
  "mcpServers": {
    "absmartly": {
      "command": "npx",
      "args": ["@absmartly/mcp", "--profile=production"]
    }
  }
}
VS Code (GitHub Copilot)
One-click install (OAuth): . You'll be prompted for your ABsmartly instance URL in the browser.
Or configure manually in .vscode/mcp.json (workspace) or via Command
Palette → MCP: Open User Configuration.
VS Code uses "servers" as the root key (not "mcpServers").
- API Key (SSE)
- API Key (Streamable HTTP)
- OAuth
- Local stdio
{
  "servers": {
    "absmartly": {
      "type": "sse",
      "url": "https://mcp.absmartly.com/sse",
      "headers": {
        "Authorization": "${input:absmartly-api-key}",
        "x-absmartly-endpoint": "https://your-instance.absmartly.com"
      }
    }
  },
  "inputs": [
    {
      "type": "promptString",
      "id": "absmartly-api-key",
      "description": "ABsmartly API Key",
      "password": true
    }
  ]
}
Recommended:
{
  "servers": {
    "absmartly": {
      "type": "http",
      "url": "https://mcp.absmartly.com/mcp",
      "headers": {
        "Authorization": "${input:absmartly-api-key}",
        "x-absmartly-endpoint": "https://your-instance.absmartly.com"
      }
    }
  },
  "inputs": [
    {
      "type": "promptString",
      "id": "absmartly-api-key",
      "description": "ABsmartly API Key",
      "password": true
    }
  ]
}
{
  "servers": {
    "absmartly": {
      "type": "sse",
      "url": "https://mcp.absmartly.com/sse?absmartly-endpoint=https://your-instance.absmartly.com"
    }
  }
}
VS Code will detect the OAuth requirement and show an Auth CodeLens to
trigger the flow. The absmartly-endpoint query parameter is optional.
{
  "servers": {
    "absmartly": {
      "command": "npx",
      "args": ["@absmartly/mcp", "--profile=production"]
    }
  }
}
MCP tools only appear in Agent mode in VS Code, not in Ask or Edit mode.
Gemini (CLI + Code Assist)
Works for Gemini CLI (terminal) and Gemini Code Assist (VS Code,
JetBrains, Android Studio agent mode). Both read ~/.gemini/settings.json
(user-wide) or .gemini/settings.json (per-project). JetBrains IDEs use
mcp.json instead.
- OAuth
- API Key
- Gemini CLI one-liner
{
  "mcpServers": {
    "absmartly": {
      "url": "https://mcp.absmartly.com/sse?absmartly-endpoint=https://your-instance.absmartly.com"
    }
  }
}
Gemini auto-discovers the OAuth requirement. In Gemini CLI, run
/mcp auth absmartly when prompted; in Code Assist agent mode the browser opens
automatically.
{
  "mcpServers": {
    "absmartly": {
      "url": "https://mcp.absmartly.com/sse",
      "headers": {
        "Authorization": "YOUR_API_KEY",
        "x-absmartly-endpoint": "https://your-instance.absmartly.com"
      }
    }
  }
}
gemini mcp add --transport sse --scope user absmartly \
  https://mcp.absmartly.com/sse \
  -H "Authorization: YOUR_API_KEY" \
  -H "x-absmartly-endpoint: https://your-instance.absmartly.com"
Gemini Enterprise (Google Cloud Console)
Gemini Enterprise's Custom MCP Server connector (Preview) requires
Streamable HTTP transport — use the /mcp endpoint:
- Google Cloud Console → Gemini Enterprise → Data stores → Create data store.
- Search "Custom MCP Server" → Add MCP server.
- Server URL:
https://mcp.absmartly.com/mcp - Authentication: OAuth — register Gemini Enterprise as an OAuth client
against your identity provider, then provide the
client_id/client_secret. Grant themcp:accessscope. - Save and wait for the connector status to become Active.
SSE transport (/sse) is not supported by this connector. The legacy Gemini
CLI / Code Assist sections above continue to use /sse until those clients add
Streamable HTTP support.
Reload the IDE window after editing settings (VS Code: Command Palette →
Developer: Reload Window). MCP support in Code Assist requires
agent preview mode — set "geminicodeassist.updateChannel": "Insiders" in
VS Code settings if not already enabled.
ChatGPT (Developer Mode)
ChatGPT does not support one-click install deeplinks — you connect remote MCP servers via the Custom Connectors UI. Requires a Pro, Team, Enterprise or Edu plan, and Developer Mode enabled (Settings → Connectors → Advanced → Developer mode).
- Go to Settings → Connectors → Create.
- Fill in:
- Name:
ABsmartly - MCP Server URL:
https://mcp.absmartly.com/sse?absmartly-endpoint=https://your-instance.absmartly.com - Authentication: OAuth
- Name:
- Save. In a new chat, click + → Developer mode → select the ABsmartly connector to add it as a tool source.
Workspace admins must first enable Custom MCP connectors in Workspace Settings → Permissions & Roles → Connected Data.
DXT Extension
- Download from mcp.absmartly.com/absmartly-mcp.dxt.
- Double-click to install in Claude Desktop.
- Enter your ABsmartly endpoint when prompted.